Installing Kubernetes cluster on Ubuntu 20.04 or Raspberry Pi (Ubuntu)
In my previous article, we went over installing kafka cluster on three raspberry pi machines. Now we would install Kubernetes cluster on set of raspberry pi machines.
Just like kafka cluster setup in link above, following instructions in this article, Kubernetes cluster can be set up on non pi machines also. Just ignore pi specific steps.

Initially I planned to setup multi master cluster. I did install master on 3 machines but then I realized that to truly use multi master setup, I need load balancer in front of it. I thought of having HA proxy in front of it but then I would have needed more resources. So, I decided to stick with single master because in home environment, that would be sufficient. Can go over multi master cluster later. I tried following setup but number of worker nodes can be 1-n:
1 Master Node — 4GB RAM, 32 GB Storage
4 Worker Nodes — 8 GB RAM, 64 GB Storage
(Just to try it, we can have lower configuration also)
First step is to setup required linux version on all machines. If not already done so or you need instructions to setup sd cards for pi, please follow steps describe here.
On all raspberry pi, make following changes to run kuberenetes:
* sudo vi /etc/docker/daemon.json
{
 “exec-opts”: [“native.cgroupdriver=systemd”],
 “log-driver”: “json-file”,
 “log-opts”: {
 “max-size”: “100m”
 },
 “storage-driver”: “overlay2”
}
(above step is to systemd as per recommendation by Kubernetes)
- sudo vi /boot/firmware/cmdline.txt
Append following to existing file:
cgroup_enable=cpuset cgroup_enable=memory cgroup_memory=1 swapaccount=1Restart all machines after making above changes.
Run following steps (1–3) on all nodes:
- Setup Docker and Kubernetes repositories:
Docker
curl -fsSL https://download.docker.com/linux/ubuntu/gpg | sudo apt-key add -sudo add-apt-repository “deb [arch=arm64] https://download.docker.com/linux/ubuntu $(lsb_release -cs) stable”
Kubernetes
curl -s https://packages.cloud.google.com/apt/doc/apt-key.gpg | sudo apt-key add -cat << EOF | sudo tee /etc/apt/sources.list.d/kubernetes.list
deb https://apt.kubernetes.io/ kubernetes-xenial main
EOF
2. Update and Install:
sudo apt-get updatesudo apt-get install -y docker-ce=5:19.03.12~3–0~ubuntu-focal kubelet=1.18.0–00 kubeadm=1.18.0–00 kubectl=1.18.0–00sudo apt-mark hold docker-ce kubelet kubeadm kubectl
3. Add the iptables rule to sysctl.conf and enable iptables immediately:
echo “net.bridge.bridge-nf-call-iptables=1” | sudo tee -a /etc/sysctl.confsudo sysctl -p
Run following only on master node:
- Initialize the cluster:
sudo kubeadm init --pod-network-cidr=10.244.0.0/16- Setup local kubeconfig
mkdir -p $HOME/.kube
sudo cp -i /etc/kubernetes/admin.conf $HOME/.kube/config
sudo chown $(id -u):$(id -g) $HOME/.kube/config- Apply Calico CNI network overlay
kubectl apply -f https://docs.projectcalico.org/v3.14/manifests/calico.yamlJoining worker nodes:
You will get command to join workers at last step. If you do not get it or lose it, you can generate it using following command:kubeadm token create --print-join-command
Run generated command on each worker node. Give it few seconds and then run following command on master node to see status of all nodes in cluster:
kubectl get nodes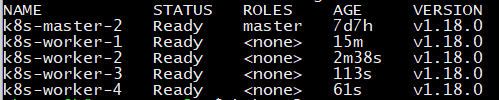
Thanks!