Setting Up a Secure and Highly Available HashiCorp Vault Cluster for Secrets and Certificates Management
Recently, I have been rebuilding my homelab from scratch. As part of that process, I wanted to ensure that security and high availability were central to any service or product I deployed. One critical need was to find a solution to securely store secrets and manage certificates for encrypted communication between services.
Given my familiarity with HashiCorp’s Vault, I decided to set up a highly available three-node Vault cluster. This setup not only serves as a robust secrets management solution but also helps in generating and managing certificates to secure communications across my network.
HashiCorp Vault is a powerful tool for managing secrets, protecting sensitive data, and securely distributing them to applications. Setting up a Vault cluster with integrated Raft storage ensures both high availability and strong data consistency, making it a great choice for my homelab environment.
High Availability (HA) Mode in Vault
Before installing Vault, let us understand HA mode in Vault. Vault’s High Availability (HA) mode is a robust feature designed to ensure continuous operation and data accessibility. By running multiple Vault servers, this mode safeguards against potential outages and system failures.

Key aspects of Vault’s HA mode:
- Automatic Activation: HA mode is automatically enabled when using a compatible data store. We can verify HA support by checking for “(HA available)” next to the data store information during server startup or on the Configuration page.
- Active-Standby Architecture: In HA mode, one Vault server becomes the active node by acquiring a lock in the data store. All other nodes become standby, ready to take over if the active node fails.
- Request Handling: Standby nodes either forward incoming requests to the active node or redirect clients, depending on the cluster’s configuration and state.
- Scalability Considerations: While HA mode enhances reliability, it doesn’t necessarily improve scalability. The data store often remains the performance bottleneck, not Vault itself.
I tested Leader switch by restarting Vault on currently active node and we’d see it switching leader/active node to one of followers:

Load Balancers and Vault: Understanding the Limitations
While load balancers are commonly used to distribute traffic across multiple servers, their role in a Vault cluster setup is limited:
Direct Access Scenario:
- If clients can directly access individual Vault nodes in addition to using a load balancer, the standard Vault HA setup should be used.
- In this case, the load balancer serves as an initial entry point, but Vault’s built-in HA mechanisms handle redirection and request distribution. The load balancer here serves as an entry point, but clients will still have direct access to any node in the cluster for redirection or forwarding, ensuring efficient communication.
Load Balancer-Only Access:
- When clients can only access Vault through a load balancer, all Vault nodes should be configured with the same
api_addr- the load balancer's address. - This setup can lead to potential issues. Standby nodes redirect clients back to the load balancer. The load balancer must be constantly updated to know the current leader’s address. This can result in redirect loops, which are inefficient and can impact performance.
Limitations and Recommendations:
- Load balancers don’t fully integrate with Vault’s HA mechanisms.
- They can’t automatically detect which node is the active leader.
- The load balancer-only setup is generally not recommended due to potential redirect loops and increased complexity.
Preferred Approach:
- When possible, allow clients direct access to Vault nodes.
- Use Vault’s built-in HA features for efficient request handling and leader election.
- Employ load balancers primarily for initial traffic distribution, not for managing Vault’s HA functionality.
Understanding these limitations helps in designing a more efficient and reliable Vault cluster architecture. In most cases, relying on Vault’s native HA capabilities provides better performance and stability than over-relying on external load balancers.
Installing Vault
On each node, ran following steps to install Vault. Could have just used package manager to do so but for clusters, I prefer manual approach to control version etc. But either approach would be fine.
cd /tmp
wget https://releases.hashicorp.com/vault/1.17.5/vault_1.17.5_linux_amd64.zip
unzip vault_1.17.5_linux_amd64.zip
sudo mv vault /usr/local/bin/
sudo chmod +x /usr/local/bin/vault
vault --version
Edit configuration file:
sudo vi /etc/vault/config.hcl
(Change node_id and addr fields on each node as needed)
ui = true

listener "tcp" {
  address     = "0.0.0.0:8200"
  tls_disable = 1  # For homelab/testing purposes only. Enable TLS in production.
}

storage "raft" {
  path    = "/opt/vault/data"
  node_id = "node1"
}

api_addr     = "http://vault-1.indubit.local:8200"
cluster_addr = "http://192.168.4.155:8201"
About config:
. storage “raft”: This defines Raft as the backend storage for Vault. The node_id is the unique identifier for each node.
- listener “tcp”: This tells Vault to listen on all interfaces (
0.0.0.0) and requires TLS certificates for secure communication. - api_addr: The API address is the external address that clients will use to communicate with this Vault node.
- cluster_addr: The internal address used by Vault nodes to communicate with each other.
- ui — To enable dashboard
We’ll enable secure communications after generating certs. I have local DNS server, so using vault-1, otherwise this would have been same IP as cluster_addr on port 8200
Using Raft Storage
Vault uses Raft as a highly available storage backend for distributed consensus. Raft ensures that all nodes in the Vault cluster have consistent state and can recover if the leader fails.
Purpose:
- Consensus: Raft ensures consistency between nodes in the cluster. If the leader fails, the other nodes elect a new leader without data loss.
- Simplicity: It provides a built-in distributed storage mechanism that does not require an external database.
- Reliability: Raft maintains strong consistency, making it ideal for critical secrets management.
Create Vault service
sudo vi /etc/systemd/system/vault.service
[Unit]
Description=Vault service
After=network.target

[Service]
User=root
ExecStart=/usr/local/bin/vault server -config=/etc/vault/config.hcl
ExecReload=/bin/kill -HUP $MAINPID
LimitNOFILE=65536
Restart=on-failure

[Install]
WantedBy=multi-user.target
Typical service steps:
sudo systemctl daemon-reload
sudo systemctl enable vault
sudo systemctl start vault
Ran above steps on all three nodes by slight changes in config file for each node.
Initialize Vault
On one node, ran following command to initialize Vault:
vault operator init
Above command will show output like below:
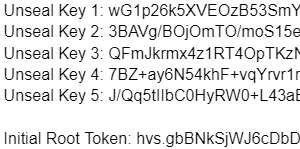
Save all these keys and root token somewhere safe. At this stage, let us make sure following environment variables are set on each node:
VAULT_ADDR
VAULT_TOKEN
VAULT_ADDR shoudl be set top same address we set on each node in config file. For VAULT_TOKEN, we can use root token for now. We would generate non-root token later.
What Happens When We Run vault operator init?
- Unseal Keys: Vault generates a set of unseal keys, which are required to unseal the Vault on startup or after a restart.
- Root Token: The initial root token is generated, which provides full administrative access to the Vault.
- Cluster Initialization: The Raft storage backend (if using Raft) is initialized, and the state of the Vault is established. This initialization is shared across all nodes because they use the same backend.
What Happens on Other Nodes?
- Other nodes do not need to be initialized with
vault operator initInstead, they just need to be unsealed after the first node is initialized. - Once a node is unsealed, it will connect to the cluster and participate as either a leader or standby node, depending on the current cluster state.
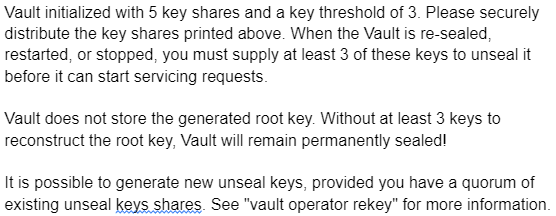
Unseal the Vault
Unseal Each Vault Node:
After initialization, each node in the cluster will be in a sealed state. We must unseal each node by running the following command on all nodes using any 3/5 keys from above:

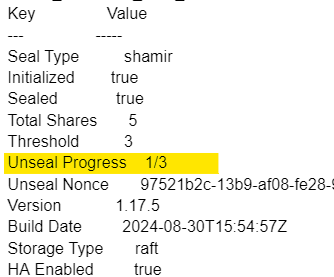
If we run ‘vault status’ after first unseal, we would see output like below:
After full unsealing, run ‘vault status’ again:
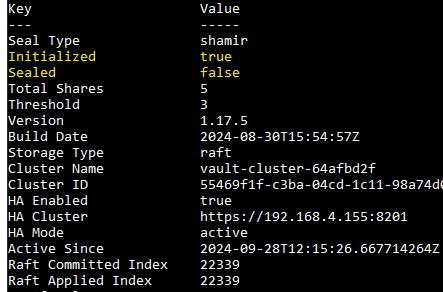
This is also good time to check cluster status for peers:
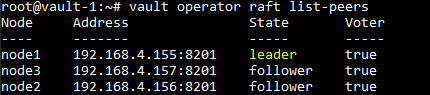
Avoid using the Root token
- The root token has unrestricted access to the Vault, which makes it powerful but risky if exposed or compromised.
- It’s best to use tokens with specific policies that grant just enough permissions for the task at hand (the principle of least privilege).
1. Create a Policy for Non-Root Tokens
We can define a Vault policy that grants the necessary permissions for our nodes. For example, if the nodes need access to secrets, we can create a policy like this (e.g. node-policy.hcl):
path "sys/*" {
  capabilities = ["read"]
}

path "pki/*" {
  capabilities = ["create", "read", "update", "list"]
}
This example policy grants read access to system paths and create, read, update, and list permissions for the PKI secrets engine.
vault policy write node-policy node-policy.hcl
2. Generate a Non-Root token
With the policy in place, we can generate a token that is bound to the policy for each node.
vault token create -policy=”node-policy” -ttl=”24h”
Store the generated token on each node:
sudo mkdir -p /etc/vault/tokens
sudo chmod 700 /etc/vault/tokens
echo "<generated-tokeb>" | sudo tee /etc/vault/tokens/token
sudo chmod 600 /etc/vault/tokens/token

#Add the following to /etc/profile.d/vault.sh or your shell profile (~/.bashrc):
export VAULT_TOKEN=$(cat /etc/vault/tokens/token)

#We can create a cron job to renew the token before it expires:
(crontab -l 2>/dev/null; echo "0 */12 * * * vault token renew") | crontab -
We had set the ttl relatvely low of 24h. Either we can increase that or leave it like that and have a cron job like in above code.
Create Users
Using token is not always convenient especially when we start using UI. We can enable Userpass Auth method:
vault auth enable userpass
Create a User: We can create a user and assign policies (which define the permissions for the user):
vault write auth/userpass/users/john \
password=”mypassword” \
policies=”default,node-policy”
(Success! Data written to: auth/userpass/users/john)
Of course, token and username are not the only options available to login:

Enabling the Key-Value (KV) Store in Vault
Vault’s Key-Value (KV) secrets engine allows us to securely store arbitrary secrets as key-value pairs. It’s one of the simplest and most commonly used secrets engines in Vault.
Step 1: Enable the KV Secrets Engine
To start using the key-value store, we first need to enable the KV secrets engine. By default, Vault doesn’t enable any secrets engines.
vault secrets enable -path=my-secrets kv
In this command:
my-secrets: The mount path for the KV engine. We can customize this path to something else if needed.kv: This specifies that the secrets engine you are enabling is the key-value (KV) engine.
If you’re using the KV version 2 engine (which supports versioning of secrets), you can specify that explicitly:
vault secrets enable -path=my-secrets -version=2 kv
Step 2: Store Secrets in the KV Store
Once the KV engine is enabled, you can start storing secrets in it. Secrets are stored as key-value pairs, where you define custom keys and values for your specific use cases.
Here’s how to store some simple key-value data, such as a username and password:
vault kv put my-secrets/myapp/config username=”myuser” password=”mypassword”
In this command:
my-secrets/myapp/config: This is the path where the secret is stored. We can organize our secrets into different paths (similar to directories) for better management.username="myuser"andpassword="mypassword": These are the key-value pairs we are storing.
Step 3: Retrieve Secrets from the KV Store
To retrieve the secrets we just stored, we can use the vault kv get command:
vault kv get my-secrets/myapp/config
This will return the secret data, including the username and password we just stored.
Step 4: Update and Delete Secrets
If we need to update the secrets, we can simply run the vault kv put command again with the updated values:
vault kv put my-secrets/myapp/config username=”newuser” password=”newpassword”
To delete a secret, we can run the following command:
vault kv delete my-secrets/myapp/config
This command marks the secret for deletion, but we can still recover it if when using KV version 2 with versioning enabled. To list all available versions of the secret:
vault kv metadata get my-secrets/myapp/config
vault kv get -version=2 my-secrets/myapp/config
At this stage, we can spend some time to get familiar with Dashboard also. Most of the time we would work through CLI or code to interact with Vault but UI does come handy sometime to view information stored in there:
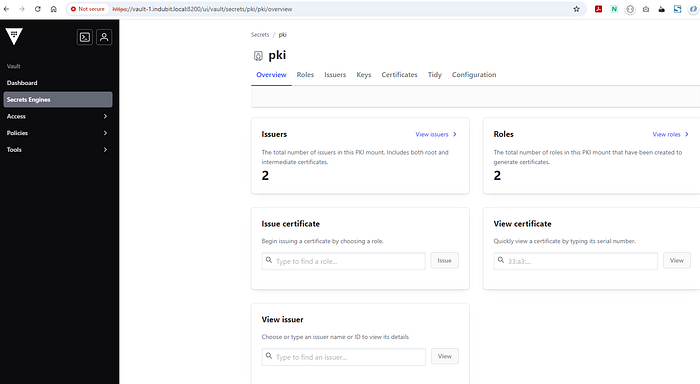
It gives us access to all enabled secrets engines, policies etc.
Further Action
Next step is to enable certificate management to help us enable secure communications. That will involve few steps to set up Root CA, Intermediate CA, Issue Certs and so on. We’ll go over that in next post.
Thanks!